
DIY Montessori Munari Baby Mobile (Simple and beautiful)
The Montessori Munari baby mobile is the first of the Montessori mobiles. If you are looking for a cheaper alternative to buying the beautiful Montessori baby mobiles, this DIY post and video will walk you through how to create a beautiful first baby visual mobile for your prepared environment.
Let me be frank here, as much as I want you to make your own Montessori mobiles, I want to warn you, mentally prepare yourself before starting this project! Most of the project is simple, but when it comes to assembling the mobile and getting it to balance just right, you may want the help of another person and a little extra patience!
The Munari mobile is the first Montessori baby mobile in a series of five different mobiles. You can use this mobile from birth until around 6 to 8 weeks of age. However, if your baby is continuing to show interest in it after 6 weeks old, you can definitely keep it out longer! Or you could rotate it back in at a later time. The Montessori Munari mobile is a high-contrast black and white mobile, using objects that are very captivating for a newborn baby.
The Munari mobile is the first Montessori baby mobile in a series of 5. You can use this mobile from birth until around 6 weeks of age. However, if your baby is continuing to show interest in it after 6 weeks old, you can definitely keep it out longer! Or you could rotate it back in at a later time. The Munari mobile is a high-contrast mobile that uses black and white objects, this is very captivating for a newborn.
What you will need
Supplies
- 1 clear glass/plastic tree ornament
- 1 binder ring
- Munari PDF template (FREE)
- Munari PDF hanging guide (FREE)
- (3) 1/4″ diameter wooden dowels cut to the following lengths
- Dowel A: 13 inches (35cm)
- Dowel B: 16.5 inches (42 cm)
- Dowel C: 8 in (21 cm)
- Cardboard, foam board, or thick tagboard
- Nylon string or fishing line
- Spray adhesive
- Black acrylic paint
- White acrylic paint
- Painters tape
- Fine grit sandpaper
Tools
- 2 paint brushes
- Scissors
- Exacto knife or razor blade
- Cutting Craft Matt
- Pin/needle
- Ruler
- Pruning shears for cutting dowels
This post contains affiliate links, which means I make a small commission at no extra cost to you. See my full disclosure here.
How to Make the Montessori Munari Baby Mobile

Step 1: Gather all of your supplies and print off Munari PDF template.

Step 2: Cut wooden dowels to the correct lengths using something like pruning shears: dowel A (42cm/15.5in), dowel B (35cm/13in), dowel C (21cm/8in).

Step 3: Sand down any rough ends after cutting with fine-grit sandpaper.

Step 4: Paint dowels A and C white. Paint dowel B black.

Step 5: Use scissors to cut out one of each of the geometric shapes. This can be a rough cut, no need to be precise here!

Step 6: Use a spray adhesive to stick the 3 shape pieces to a piece of cardboard or foam board. This will be the start of the high-contrast cards for your assembled Munari mobile.
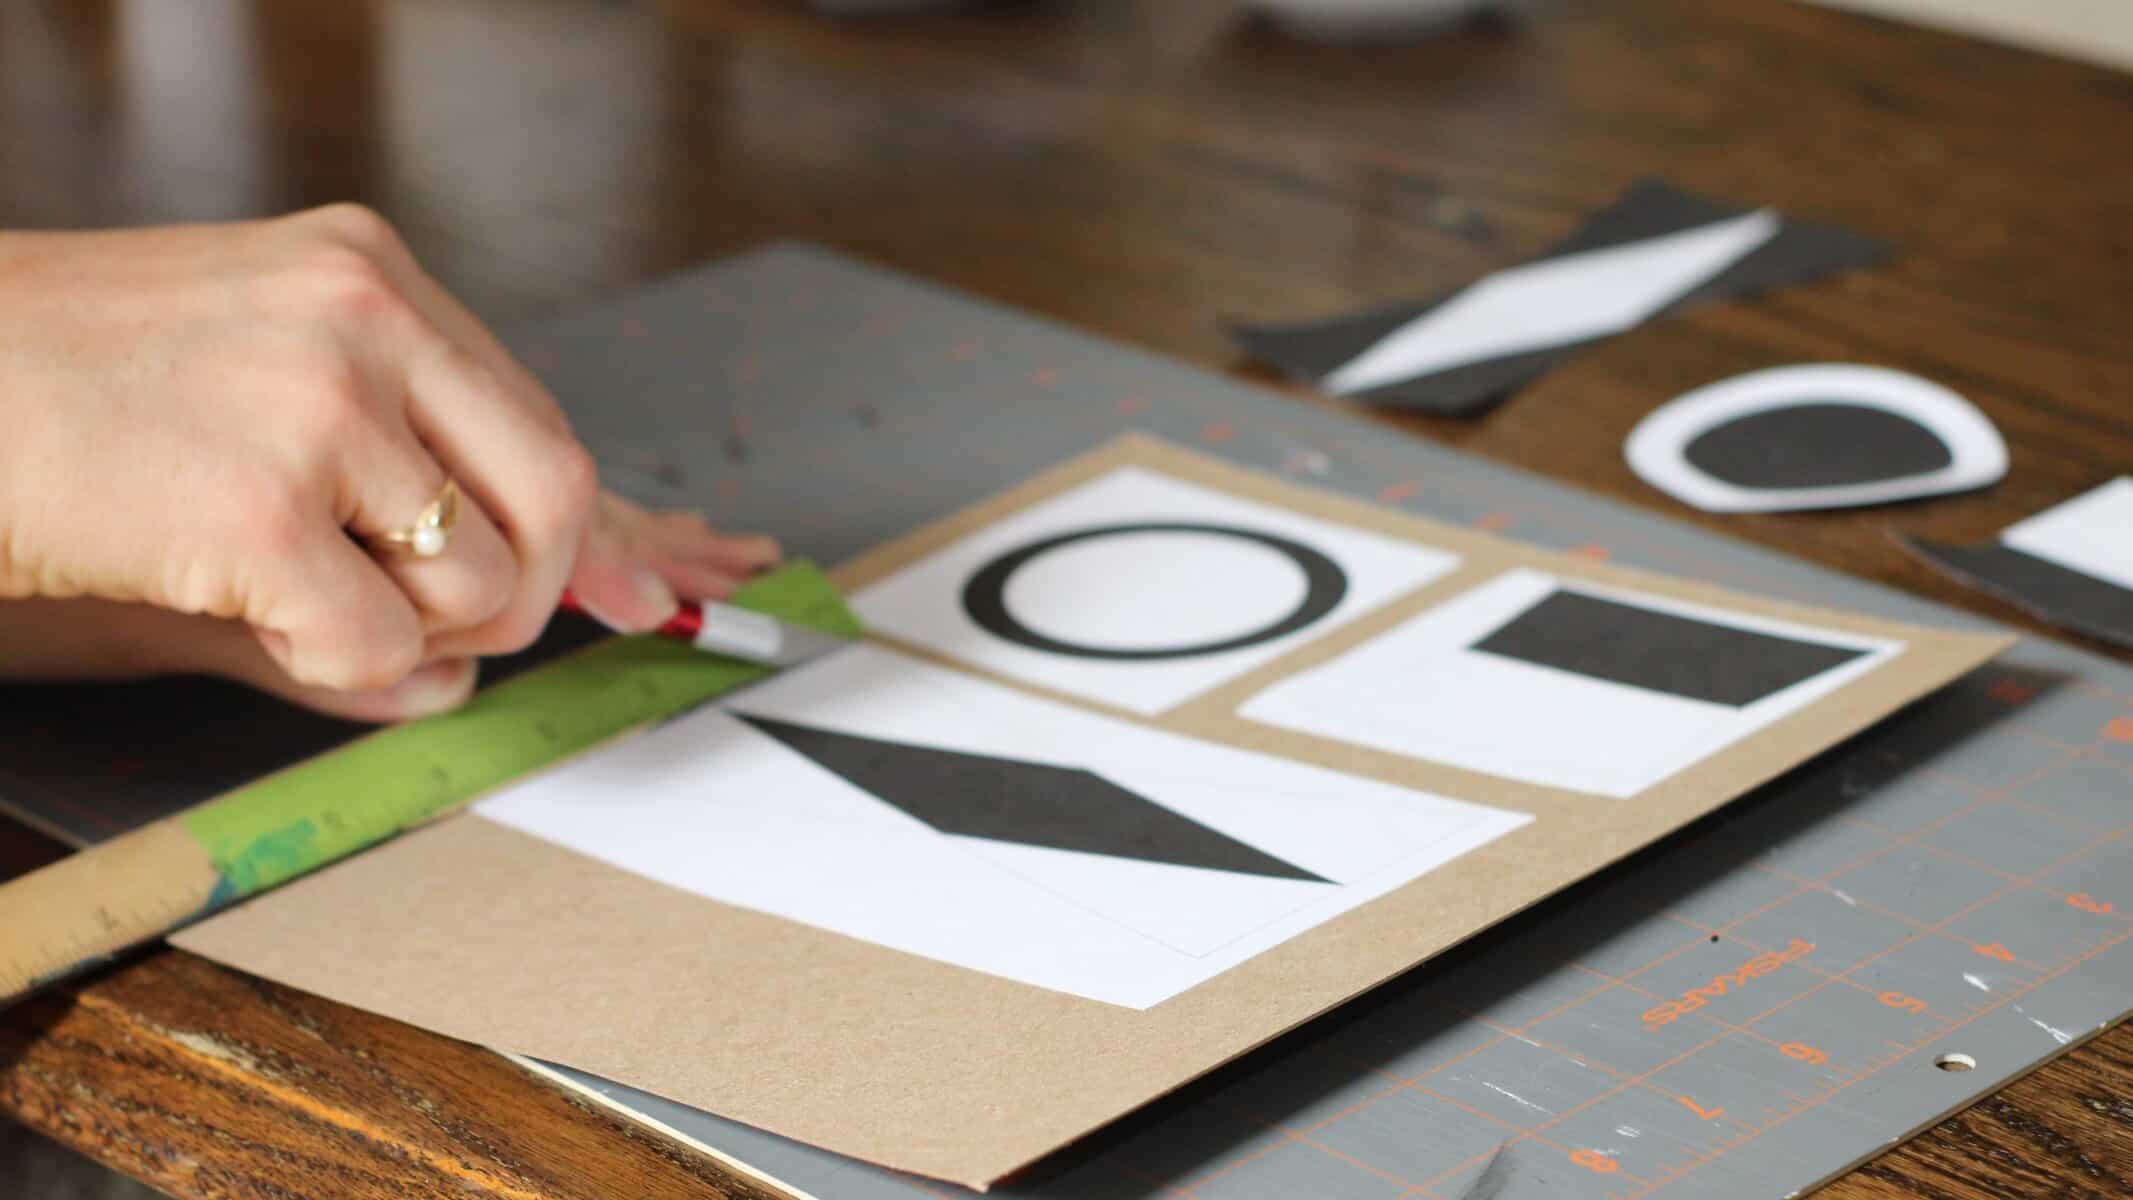
Step 7: Using a straight edge and an Exacto Knife, cut out the shapes on your craft cutting mat. You could also use scissors if your cardboard is thin enough.

Step 8: Cut out the other pieces of shapes with scissors, be precise with these cuts.

Step 9: Use spray adhesive to stick the shapes to the other side of the cardboard.


Step 10: When dowel C (the shortest dowel) is dry, take a piece of painter’s tape and cut about one-third of the width of the tape strip. Wrap the strip of tape around the dowel so it looks like a candy cane.

Step 11: Now paint dowel C black; this will create a black-and-white spiraled dowel.

Step 12: Let the paint dry and then remove the painter’s tape.

Step 13: IF YOU USED FOAM BOARD: you can poke a hole with a needle into the foam part and then use a hot glue gun to set the string into place.
IF YOU USED CARDBOARD: take a needle and poke a hole at the top of the shape. Thread the string into place. Tie a fishing knot or another secure knot. Tie string to the glass/plastic ornament as well. Follow the link to an easy-to-follow video on how to tie a fishing knot.
Step 14: Assemble to Mobile
Now it’s time to put the mobile together! Take a couple of deep breaths before you begin—and maybe grab a snack first so you don’t get hangry. Balancing the pieces can be a little tricky. I ended up asking my husband for help, and honestly, he was able to get it balanced way faster than I could have on my own. Balancing this mobile will take you back to your high school science class, where you learned about balancing and where to place your fulcrum.
First, attach the pieces to their correct dowel, then attach the dowels. Use fishing knots or another secure knot when attaching the pieces. You will be able to fine-tune it and balance it once everything is attached. When balancing, start at the top and get the ornament to balance with the other dowels and pieces. Once Dowel A is balanced, the rest will be easier to balance and adjust. Place on a mobile hanger of some sort, or store it in a cool, dry place until you need this mobile for your baby!


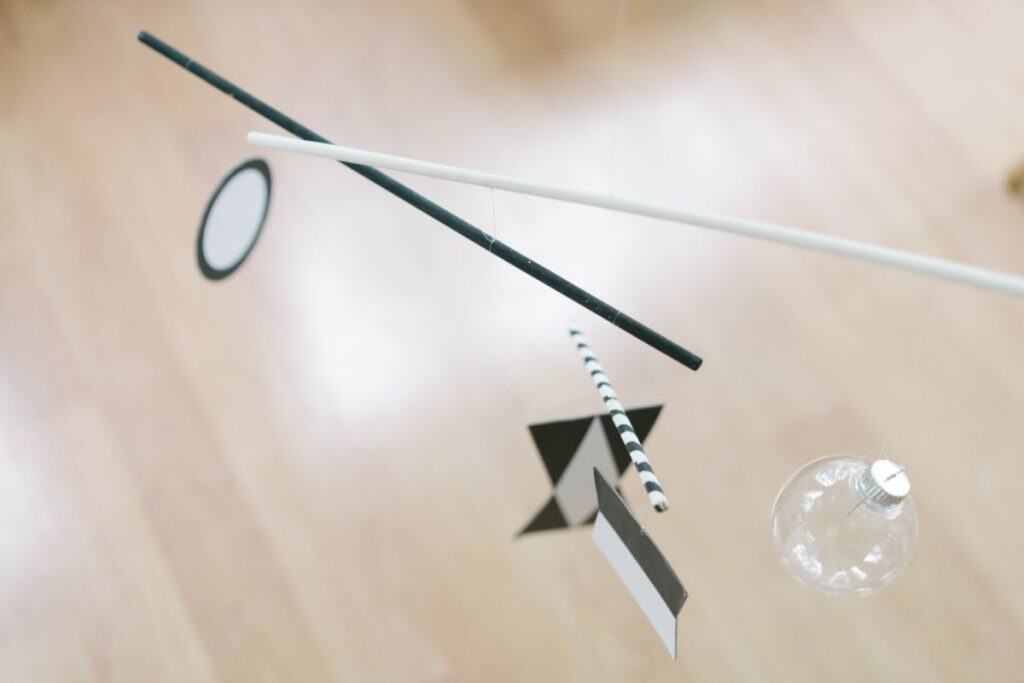
DIY Montessori Munari Baby Mobile

The Munari Mobile is the first Montessori mobile we will use with our babies. A baby could begin enjoying this as soon as a few days after birth. The Munari mobile is a high-contrast mobile with black and white objects.
Instructions
- Gather all of your supplies and print off Munari PDF template
- Cut dowels to the correct lengths: dowel A (42cm), dowel B (35cm), dowel C (21cm)
- Paint dowels A and C white.
- Paint dowel B black.
- Use scissors to cut out one of each shape roughly (no need to be precise here!)
- Use spray adhesive to stick those pieces to the cardboard or foam board.
- Using a straight edge and an Exacto Knife, cut out the shapes on your craft cutting mat. You could also use scissors if your cardboard is thin enough.
- Cut out the other pieces of shapes with scissors, be precise with these cuts.
- Use spray adhesive to stick the shapes to the other side of the cardboard shapes.
- When dowel C is dry take a piece of painter's tape and cut a third of the width of a strip. Wrap the strip of tape around the dowel so it looks like a candy cane.
- Paint dowel C black, creating a black-and-white spiraled dowel. Let the paint dry and then remove the painter's tape.
- IF YOU USED FOAM BOARD: you can poke a hole with a needle into the foam part and then use a hot glue gun to set the string into place.
- IF YOU USED CARDBOARD: take a needle and poke a hole at the top of the shape. Thread the string into place. Tie a fishing knot or another secure knot.
- Tie string to the glass/plastic ornament
- Assemble the mobile. First, attach the pieces to their correct dowel, then attach the dowels to each other. Use fishing knots or another secure knot when attaching the pieces. You will be able to fine-tune it and balance it once everything is attached.
- When balancing, start at the top and get the ornament to balance with the other dowels and pieces. Once Dowel A is balanced the rest will be easier to balance and adjust.
- Place on a mobile hanger of some sort or store for when you need this mobile for your baby!
Notes
I found using a fishing knot is a very secure way to attatch the pieces to the dowels and attach the string to the mobile pieces. Watch this video to learn how to tie a fishing knot.
What is a Montessori mobile?
A Montessori mobile is a carefully designed visual mobile created to support a baby’s earliest development. Unlike decorative mobiles that hang over a crib for entertainment, Montessori mobiles are simple, intentional, and offered to the baby while they are awake and alert—often while lying on a mat in a prepared movement area. There is a mobile progression that starts with the Munari mobile, which focuses on high-contrast colors, black and white shapes, with a glass ball (see the video tutorial here). As the mobile moves gently through the air, it will help a newborn strengthen eye muscles by developing visual tracking skills and visual focus.
The first Montessori mobile is the Munari mobile (black-and-white, high-contrast shapes), and then moving on to mobiles with color, movement, and depth. Each mobile helps babies practice important skills like visual tracking, focus, concentration, visual discrimination of contrast color, and shape.
When should I start using the Munari mobile?
The first mobile can be used very shortly after birth; it is really up to you when you are ready to start. I had the Munari mobile prepared and set up in our Movement area when we brought our identical twin boys home from the hospital. I chose to have it set up right away because it was great to have a place to put the boys down when they were awake and offer them something interesting.

What Montessori mobile do I use next with my baby?
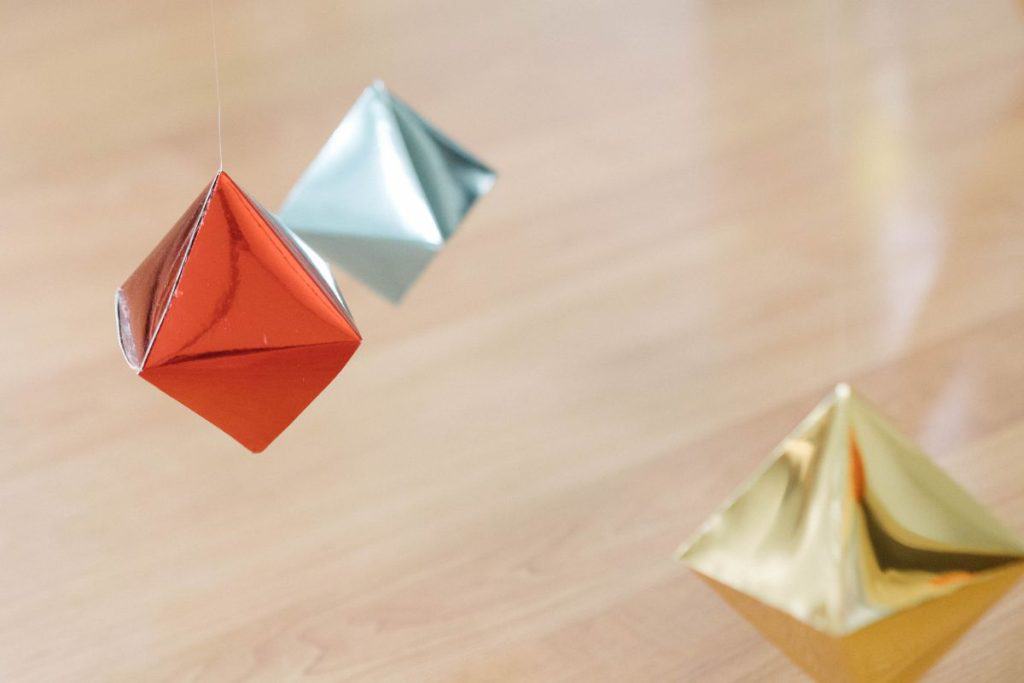
The next mobile in the sequence is the octahedron mobile. The Montessori Octahedron mobile is made of three-dimensional octahedra in the primary colors (red, blue, and yellow). Typically, these three-dimensional shapes are made with iridescent paper so they catch light while introducing the baby to the idea of basic colors and color perception. This mobile can be introduced between 6 to 8 weeks of age. If you are looking for a good project, check out this DIY video tutorial on how to make it yourself!
What are the main Montessori mobiles?
Visual Mobile Series
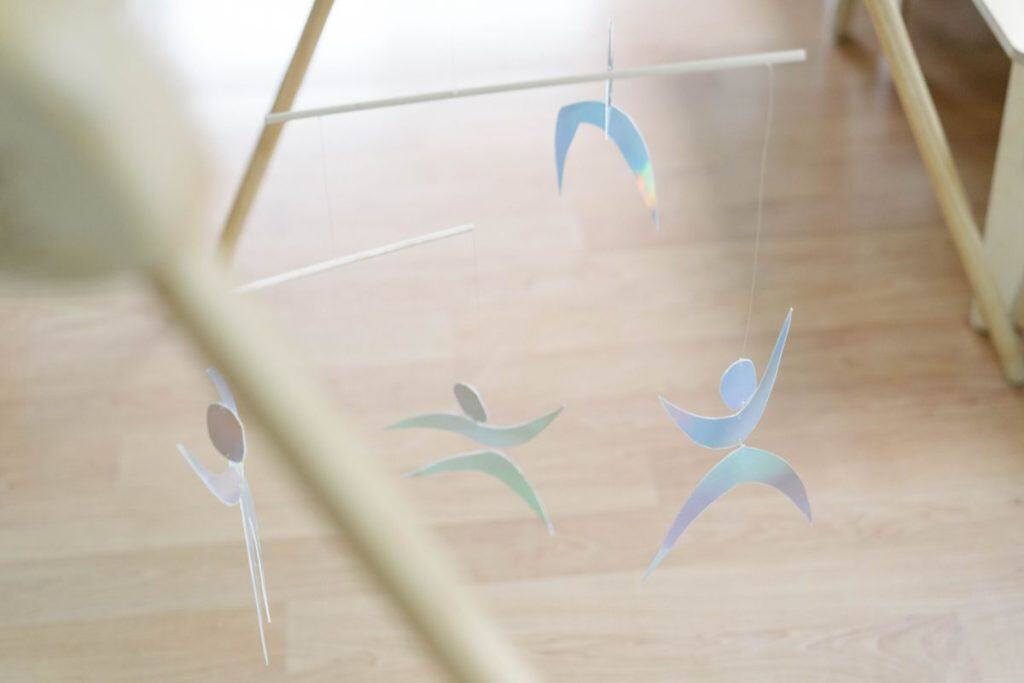
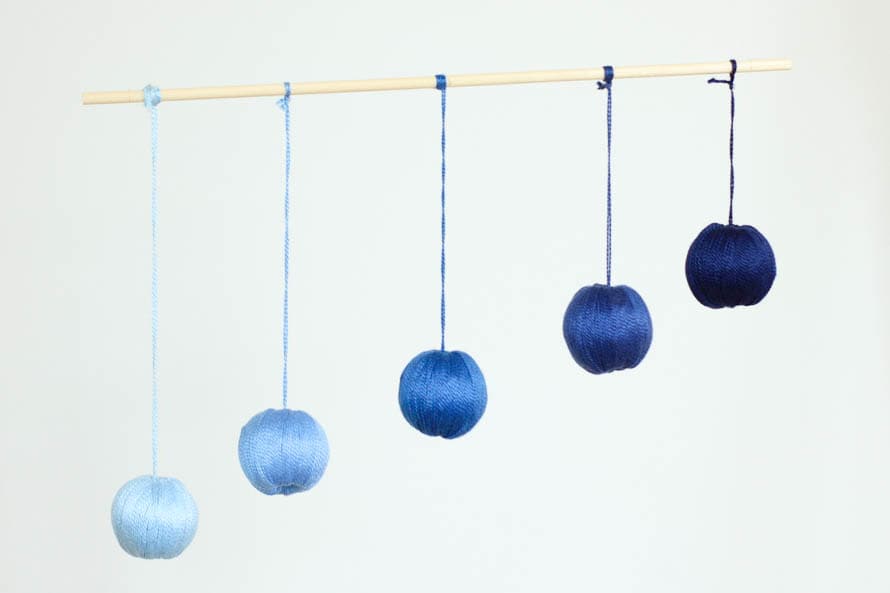
The Montessori Visual Mobiles start with the Munari mobile, which you can learn how to make in a video tutorial here. The next Montessori mobile is the Octahedron mobile, which uses reflective paper and three-dimensional shapes to develop the visual sense of color perception. Get a full video tutorial here or check out the blog post here. Next in the series of Montessori mobiles is the Gobbi mobile. This mobile is composed of five balls in a gradient of one color, arranged from dark to light, suspended from a wooden dowel. This makes a great DIY project using styrofoam balls and different shades of embroidery threads. The last formal Montessori visual mobile is the Dancer mobile. Shimmering, abstracter “dancer” shapes move gracefully through the air, encouraging tracking of objects.
Montessori Tactile Mobiles
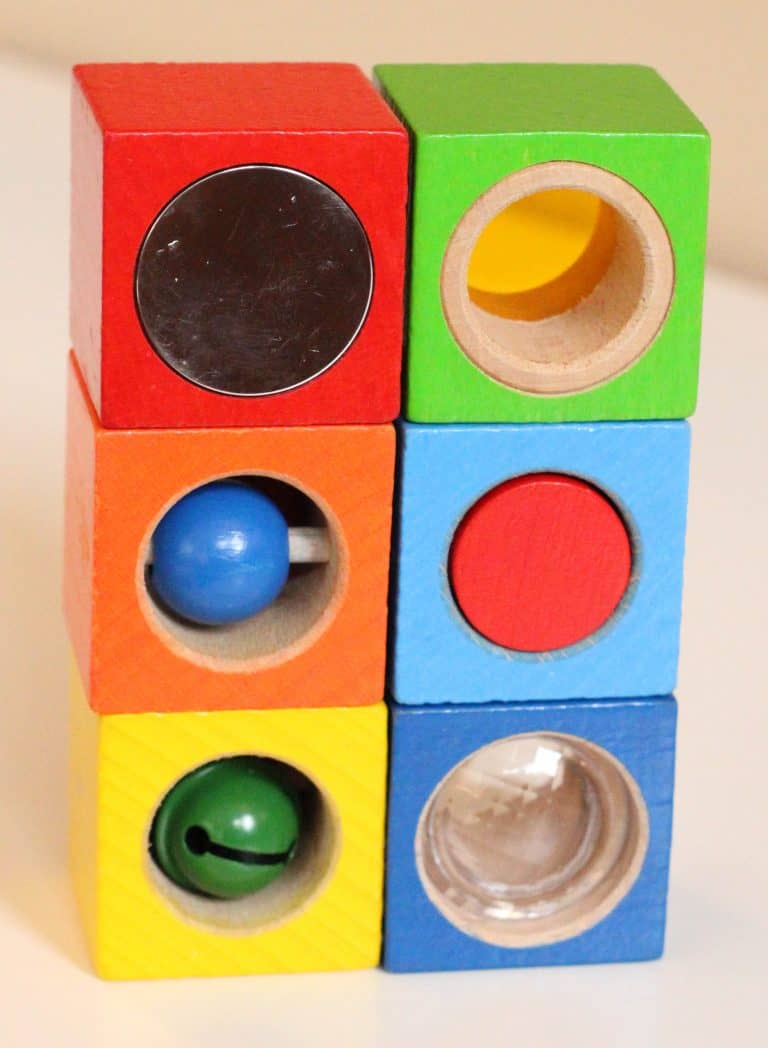
Around 3-4 months of age, young babies will be ready for more interactive tactile mobiles, especially if they have been working with the previous mobiles. These mobiles will still support visual development but now have a greater focus on hand-eye coordination, requiring even more of your baby’s attention. With the ribbon mobile, bright colors of ribbons hang through an embroidery hoop attached to your mobile hanger with elastic, so your baby can grasp the ribbons and pull them towards their face. Another simple but purposful mobile is the bell mobile, where a bell is attached to a ribbon. As your baby moves their body, their hand or foot may hit the bell, which makes a sound, helping the baby see the effect of their movements.

For more information on all of the visual and tactile Montessori baby mobiles, check out this blog post! For more ideas on how to bring the Montessori method into your home to support the cognitive development of your baby, check out this blog post.
How do I hang my Munari mobile?
I have hung my mobiles from a floor mobile hanger. Alternatively, you could anchor a hook in the ceiling, hang a long ribbon down, and then connect the mobiles closer to your baby’s level. I have also seen people use a wind chime hanger that juts out from the wall, which would allow you to hang the mobile from it and still have it move freely. By having a hook in the ceiling or a hanger coming off the wall, you are freeing up space on your floor in your Montessori environment, which is a nice option, I think.

How do I store my mobile when I’m not using it?
I found it best to store all of my mobiles in a plastic storage container. Place tissue paper between each mobile so they don’t get tangled up with each other. I have seen some hang their mobiles on the wall as wall decor.
Where do I set up a Montessori mobile in my home?
It is recommended to have a Montessori movement area in your home with a soft blanket, a low mirror, and the traditional Montessori mobiles. Want to learn more about how to prepare a Montessori movement area to support your baby’s development? Check out this blog post where I outline the 3 essentials to have in your Montessori movement area.


This is absolutely brilliant and so adorable! Thank you for sharing 🙂
Thank you for taking the time to read! It has been a beautiful addition to our home for our boys!
Thank you for this tutorial! I had a Munari Mobile when my son was a newborn, but we sold it right before a big move. It’s so nice to be able to make it yourself and not have to spend $$ on one!
Yes! I couldn’t agree more!
I just loved this post! The DIY Munari mobile is so simple yet so beautiful. I’m pregnant with my first child and I’ve been wanting to create a peaceful nursery for my little one. Your tutorial is so easy to follow and I can’t wait to start making this mobile. Thank you for sharing!
Congratulations! How exciting! The Munari mobile is so perfect and I know your little one will just love working with it! I’m glad you found the tutorial helpful. I have the next mobile, the Octahedron Mobile, up on the blog and my YouTube channel as well if you want to make additional ones.